In this article:
Why plan your email marketing?
Being organized will allow you to send out quality content to your customers on a regular basis, respecting deadlines. You’ll therefore maximize every opportunity and events that could potentially stimulate sales from your customers or generate interest from your recipients. Establishing a calendar will also allow you to plan your ideas ahead of time and think about the necessary material (content, images, blog articles to link etc.) you’ll need to gather before your deadline.
What’s the use of the Calendar tool?
The calendar tool found in your account was built to let you see in a quick glance past and future mailings. From the Calendar, you’ll not only be able to see what mailings were sent in the past, but also allow you to access the statistics for these mailings and use the content again, if needed. Comparing your marketing strategies from previous years will allow you to draw inspiration from your good (or less good) moves to improve your future emails.
We have also written in the calendar events or holidays that could generate email marketing needs. You’ll be able to add to those pre-entered events your own, relevant to your customers or company.
The Calendar tool is above all else a collaborative tool, to facilitate the communication of your email marketing strategy with your team.
How can I access my calendar and what information can I find in it?
To access the calendar:
Click the "Calendar" icon from the fast access icons on the left of your account.

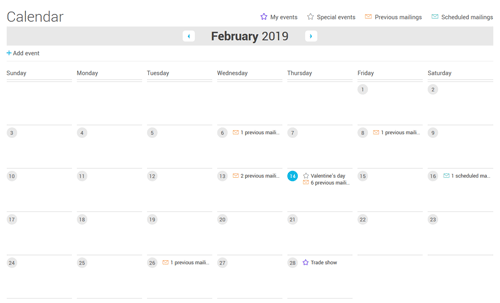
What you’ll see on your calendar:
![]()
![]()
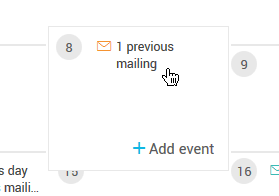
- Your previous mailings: previous mailings will be identified by an orange envelope. Mailings from previous years will appear in the current month so you’ll be able to see in a quick glance what was sent in years prior to the same date range.
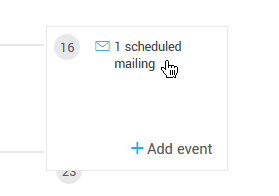
- Your scheduled mailings: scheduled mailings will be identified by a turquoise envelope.
- Your events: your personal events are identified by a violet star. Those are events you added manually. Every user in your account will be able to see them which will make team planning easier.
- Special events: special events are identified by a grey star. Those are events that are annual and common to most businesses such as Christmas or Valentine’s day with a high chance of being used for email marketing campaigns. They are automatically added by the system and can’t be edited.
How can I add events to my Calendar?
Why should I add events to my calendar?
Adding events to your calendar will allow you to see quickly upcoming events relevant to your company. These events could be a great occasion to send an email to your customers. They could be anything: A trade show you’re planning to attend, the start of a contest, the launch of a new product, the first day of training you’re offering, the start of a fundraiser, etc. You can also use events to mark down deadlines, add memos to help organize and plan email campaigns or, if needed, your other marketing strategies.
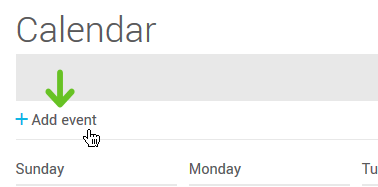
Here is how to add an event to your calendar:
- Click the "+ Add event" button available at the start of each month or place your mouse on the exact date you wish to create your event on and click "+ Add event."
or
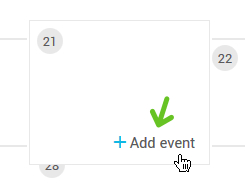
- Enter the event name, validate the date and write a description, if need be.
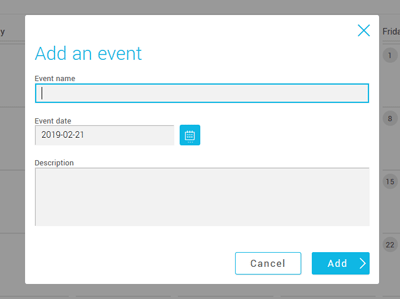
- Click "Add >"
What actions can I do from the Calendar for previous mailings?
Here are the actions available from a previous mailing:
- Consult previous mailing statistics
- Reuse the visual of a previous mailing
- Obtain the online version URL
* All the above options are also available from the previous mailing section. To go to your previous mailings, select the Mailings menu > Previous Mailings.
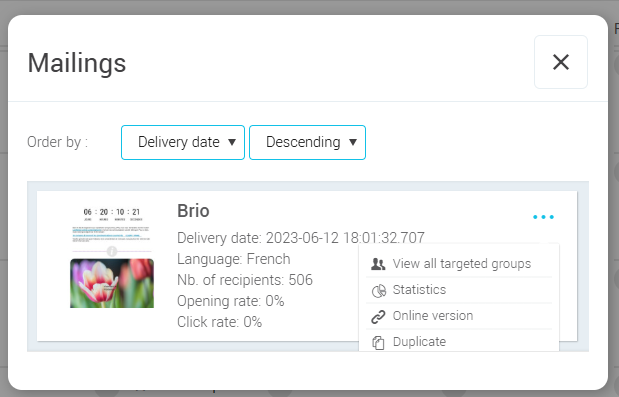
Consult previous mailing statistics
- Click on a "Previous mailing" label (orange envelope) in the calendar, then open the action menu for the mailing you wish to see the statistics.
- Select "Statistics" in the menu.
Reuse the visual of a previous mailing
- Click on a "Previous mailing" label (orange envelope) in the calendar, then open the action menu for the mailing you wish to use the visual in a new mailing.
- Select "Duplicate" in the menu. It will create a copy of your previous mailing that you can use to create a new one.
- Edit the draft if necessary. You’ll be able to either save your draft or complete the mailing process. To learn more about how to send out a mailing, click here.
Obtain the link to the online version of your previous mailing
- Click on a "Previous mailing" label (orange envelope) in the calendar, then open the action menu for the mailing you wish to get the online version link of.
- Select "Online version" from the menu.
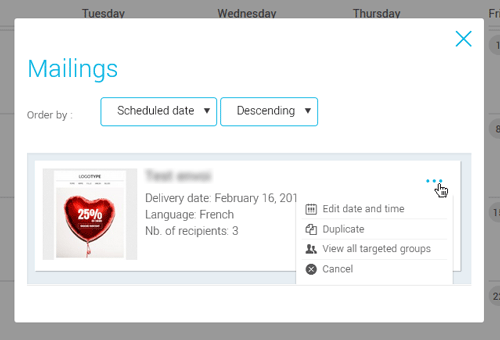
What actions can I do from the Calendar for scheduled mailings?
To access the actions for a previous mailing, click on "Scheduled mailings" (turquoise envelope) in your calendar, then click the action menu for the scheduled mailing you wish to edit and select one of the following options:
- Edit date and time
- Duplicate
- View all targeted groups
- Cancel
* All the above options are also available from the scheduled mailing section. To go to your previous mailings, select the Mailings menu > Scheduled mailings tab.